Contents
click here to Download the Most Important 13 Books in Cement Industry
click here to Download the Most Important 13 Books in Cement Industry
INSPECTION OF THE KILN SYSTEM
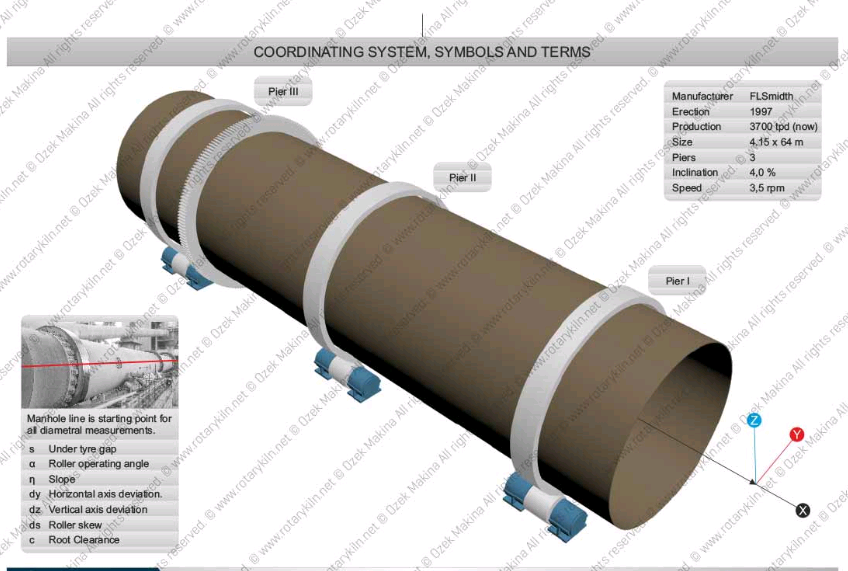
credits go to © F L Smidth A/S
GENERAL
The rotary kiln is the central machine in a cement manufacturing plant. A high avail-ability, a high run factor, i.e. a stable mechanical function of the rotary kiln over a pe-riod as long as possible is essential for the overall economy of the plant.
Spontaneous stop of the kiln will not only cause expenses in terms of spare parts and repair costs but will also cause loss of production which can be difficult to retrieve.
The run factor is particularly dependent on the condition of the lining, the lifetime of which is related to the mechanical condition of the kiln system. In order to determine the mechanical condition it is necessary to carry out regular inspection of the individual components of the kiln system to be able to discover, monitor and rectify any fault or development of wear which would eventually lead to a uncontrolled, spontaneous stop of the kiln.
INSPECTION
The components to be inspected during normal operations of a kiln are as follows:
-Supporting rollers and Bearings
-Live-rings
-Thrust roller(s)
-Drive station inc. Barring device
-Kiln shell
-Seals at in- and outlet.
During a shutdown of the kiln further inspection can be carried out:
-Inclination of supporting rollers
-Inspection of pinion and girth gear for drive station
-Inspection of girth gear mounting
-Inspection of internals in cooler and kiln if relevant (together with production department)
-Drive station
-Kiln shell, crack detection.
In the following, the inspection of the above mentioned components will be described in general. It is also necessary, however, to study the relevant instruction from the participant’s own plant in detail in order that the inspection of the equivalent components is carried out as prescribed by the supplier.
All the observations made shall be recorded every time an inspection has been carried out so that comparison between the observations can be made and any onset of a development can be detected. The inspection comprises:
Supporting Roller and Bearing
-Control of graphite lubrication
-Condition of roller path (pitting /facets / fish scaling / wear / other)
-Temperature of roller path Check the direction of the reaction between supporting roller and live-ring (Contact / no contact between thrust plate (2) and bearing liner (1) -see Figure 3.1 and for a more detailed explanation refer to section 5.1.2)
-Distribution of oil over the journal surface of the side where the journal leaves the liner.
-Oil level in gauge (3)
-Oil scraper (4) where relevant
-Cooling water supply
It is also essential to check the general cleanliness around the supporting rollers. If the bases are not kept clean and free from oil spillage the actual inspection will suffer. The inspector will not be able to perform his job correctly if he cannot move around freely.
Live-ring
-Condition of roller path (Pitting / facets / fish scaling / wear / other)
-Live-ring migration The relative movement between live-ring and kiln as described in detail in Section 4 of this chapter.
-Live-ring position in relation to the retaining rings
-Condition of the retaining rings
-Condition of supporting blocks
-Lubrication between live-rings and supporting blocks/kiln.
Drive station
Inspection of the Drive Station including Barring Device is described in detail in section 9 of this chapter.
Thrust Rollers
-Control of graphite lubrication
-Condition of contact face (Pitting/facets/fish scaling/wear/other)
-Oil level
-Oil pressure
-Hydraulic system where relevant (Pressure / leaks / level in tank).
Kiln Shell
As a result of mechanical or thermal overloads fatigue symptoms may appear in the welded joints. Fatigue cracks always begin as micro-cracks in connection with notch effects, and inspection of kiln and cooler is therefore important.
The following weld seams should be examined for fatigue cracks:
-circumferential seam between the kiln support section and the transition section and between the transition section and the adjoining section – see Figure 3.2
-welds at manhole reinforcement frame – see Figure 3.3
The planetary cooler suspension is exposed in the same way as the kiln and cooler tubes. Its critical areas must therefore also be examined visually.
During normal operation of the kiln it is of course not possible to carry out a detailed examination for cracks. Thorough crack detection will be described later in this section.
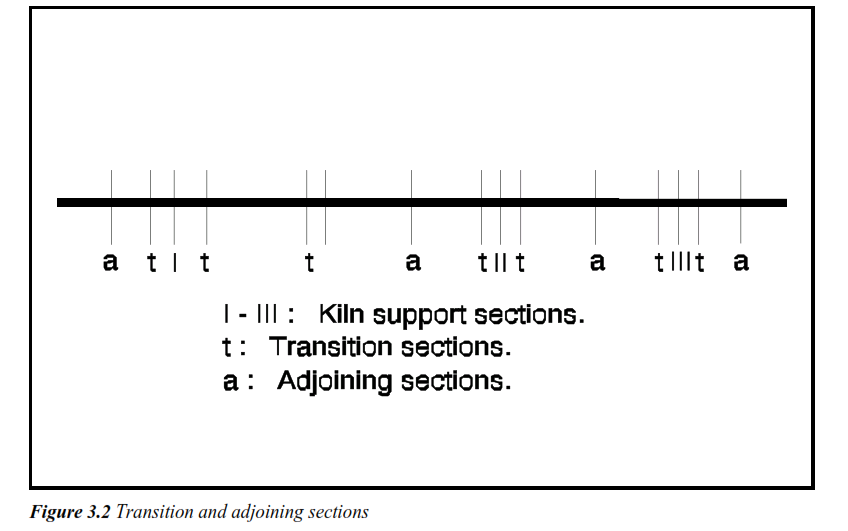
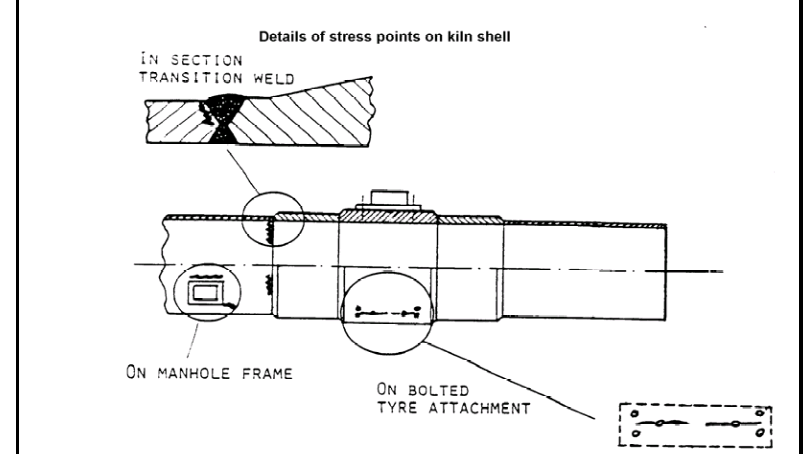
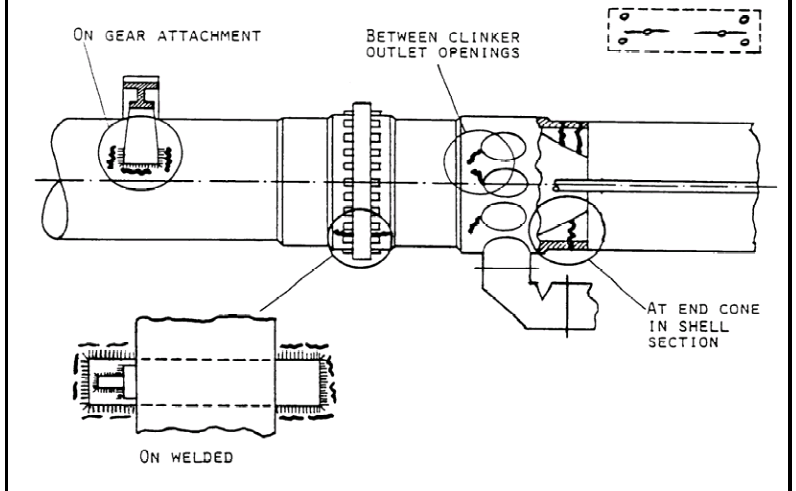
Figure 3.3 Kiln shell welding check
Seals at inlet – and outlet end
There are numerous different designs of sealing arrangement between the rotating kiln and the stationary smoke chamber to be found. In the inspection programs, however, there are similarities:
• Control of contact between rotating and stationary parts
• Control of free movement
• Inspection of wear parts
• Lubrication
Pneumatic system (if relevant).
Similar for the sealing arrangement in the outlet end: The inspection programs will be similar to the seal in the inlet end irrespective of the cooler type (i.e. grate cooler or planetary cooler):
• Control of contact
• Control of free movement
• Inspection of wear parts
• Lubrication
• Pneumatic system (where relevant)
• Seal cooling system ( where relevant).
The following inspections can be carried out during kiln stop:
A. Measuring of supporting roller inclination
B. Inspection of teeth and girth gear mounting for drive station
C. Inspection of interior of the kiln and cooler (where relevant)
D. Crack detection.
Re. A: The inclination of the supporting rollers can be measured by means of an in-strument as shown in Figure 3.4.
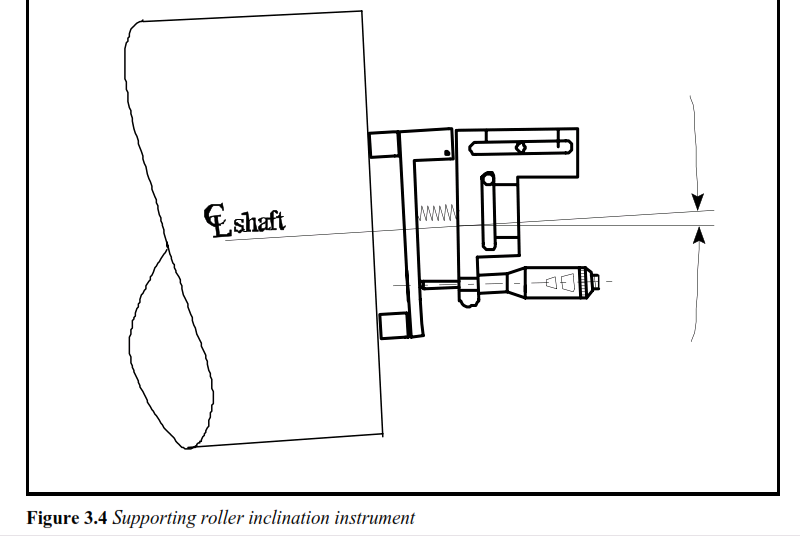
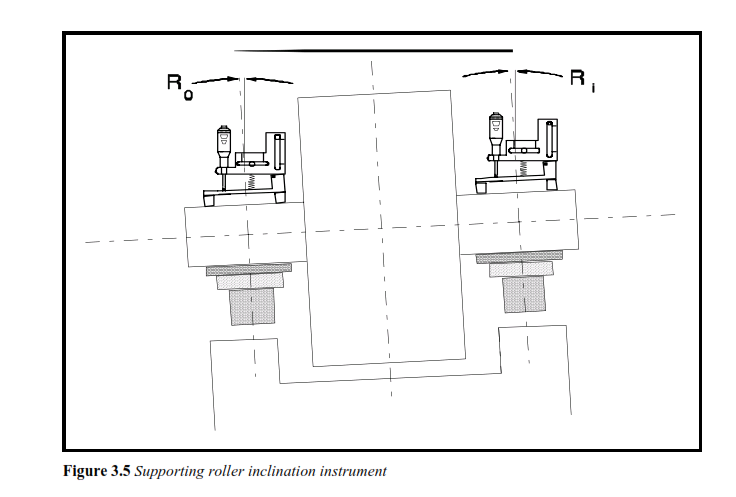
If the contact between rollers and live-ring is not correct a cause could be that the roller inclination has changed. Through inclination measurement it is possible to calculate the required correction to the inclination.
Description and mode of operation
The inclinometer (see Figure 3.6 and 3.7) consists of a magnet holder (09) hinged to a spirit level holder (02) by means of a pivot (08). Both holders are made of silumin.
The magnet holder supports two cylindrical magnets (10) and an adjustable stop bolt (13) fitted with a ball point The stop bolt is locked with the screw (04).
The spirit level holder is fitted with a micrometer calliper (05). A spring (11) holds the micrometer calliper against the ball point of the stop bolt.
Two large spirit bubble levels (03) and (04) are used to measure the horizontal and vertical plane deviations. The spirit bubbles can be adjusted using the screws (06).
{Figure 3.6 is lacking – impossible to copy and transfer from original document}
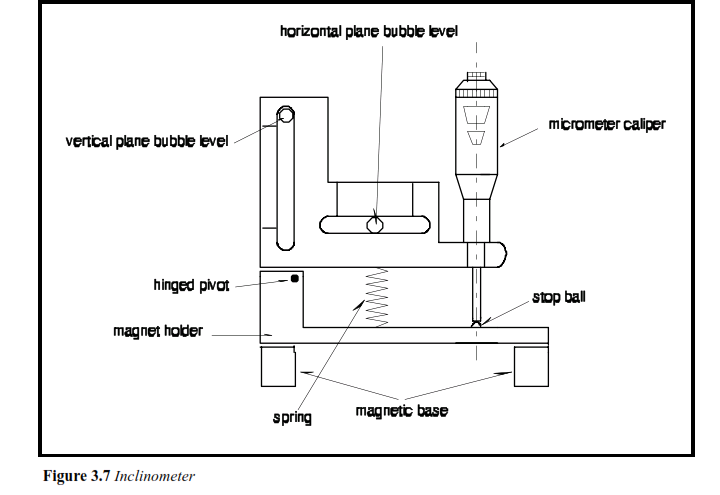
The small spirit bubble levels (01) and (07) are directional spirit levels used to check the position of the inclinometer on the surface.
When using the inclinometer on round surfaces, e.g. journals, the magnet holder can be fitted with a supporting bridge, see Figure 3.4. This is attached to the magnet holderwith a dovetail (12).
The exact gap between the micrometer calliper and the pivot (08) is 100 mm. The millimetre graduation of the micrometer calliper is equal to the inclination rate therefore 1
mm on the scale corresponds to 1% inclination.
Example:
0,002 mm on the micrometer scale is an inclination of 0,002% or 0,02 mm per 1000 mm.
The measuring range of the micrometer calliper is 0 – 25 mm, but the hinge between the magnet holder (09) and the spirit level holder (08) limits the actual physical measuring range to 0 – 20 mm (± 10 mm).
When measuring the inclination of a loaded supporting roller, insignificant variations between the measurements on the two shaft ends may occur due to the deflection of the supporting roller. This is not unusual, compensation for this discrepancy is obtained by using the average measurements when computing the inclination rate.
An Example of Inclination Measurement:
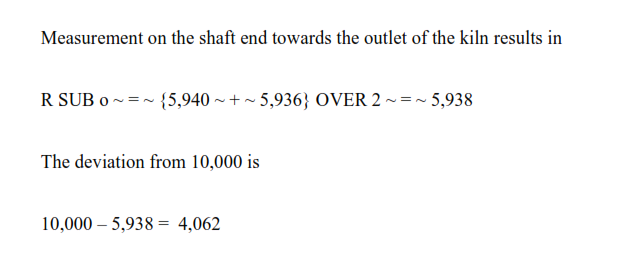
To measure the inclination of an unloaded supporting roller that is to be adjusted for an inclination of 4% is as follows:
Measurement on the shaft end against the kiln outlet results in

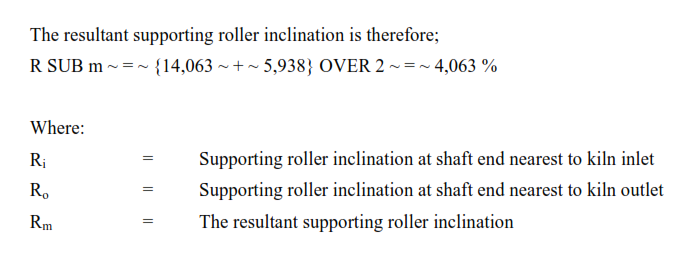
Re. B. Inspection of girth gear mounting for drive station.
Re. C. Inspection of interior of the kiln and cooler.
The interior shall be inspected together with the production department. The production staff can decide if the interior can meet the production demands whereas the mainte-nance department can assess the actual mechanical condition.
A chain should be replaced when the chain weight has been reduced by 50% or when individual links have become worn to approx. half thickness.
Chain wear is often heaviest on the chain links closest to the suspension points, but may also occur elsewhere on the chain. No general specifications can be given on the service life of a chain system.
A worn-out cross system will have negative impact on the thermal economy. If this is acceptable, it will be reasonable to examine and possibly also repair the cross system in connection with kiln shutdown of appropriate duration. Where temporary repair work is undertaken, loose parts must be removed, and where required, damaged cross plates over the arched section of the brick lining are cut off. Based on an evaluation of the efficiency and condition of the cross system repairs can be planned so that the necessary replacement sections are held available during scheduled shutdown of kiln.
Re D. Crack Detection
A thorough crack detection can only be carried out during a planned stop. To some ex-tent, the frequency of the periodical examination of the welded seams should depend on the operating conditions of kiln. Where normal operating conditions apply, an interval of two years would seem appropriate.
If the kiln has been in operation for more than 5 years, however, a visual inspection of the welded seams once a year is recommended. Where operational irregularities may have increased the stress loading on the welded seams, an additional inspection of those welded seams which have been exposed to exceptionally severe stresses should be made. Any repairs by welding must be re-checked after 6 months of operation.
METHODS OF EXAMINATION
Visual Inspection
The visual inspection of the kiln welds constitutes the simplest and, at the same time, the most important form of examination as to the condition of welds.
In connection with the visual inspection, an initial check-up should be made without removal of rust and dirt from the welded seam, since it is quite often easier to identify a possible crack formation with the welded seam un-cleaned. After this initial inspection, the surface of the welded seam is carefully cleaned using a hammer and a wire brush, and grinding may also be required.
In connection with the subsequent visual inspection, it must be remembered that many “irregularities” in weld may resemble cracks. It is recommended that the cleaned welded seams are also dyepenetrant tested, or, better still, subjected to a magnetic particle examination.
Dye-penetrant testing
The dye-penetrant is a liquid with a strong colour (red) which, when applied to a metal-lic surface, penetrates into possible cracks, and by means of a “developer” the evidence of cracks is increased.
Procedure:
Procedure:
A. Remove grease, dust and scale from the surface
B. The dye-penetrant liquid to be applied by painting or spraying to the cleaned area in a uniform layer.
C. The dye-penetrant liquid must be allowed time to penetrate into possible cracks. 10 minutes will be sufficient at temperatures from 0 to 60° C.
D. Carefully remove any excess dye-penetrant liquid. If the liquid is water-soluble, water should be used, otherwise use the relevant solvent.
E. The dye-penetrant liquid must never be removed by “flushing”; always wipe off the liquid by means of a lint-free cloth.
F. Wait until the surface has dried, and then apply a thin layer of “developer”, which is a high-absorbent white powder, suspended in a volatilesolvent.
G. After evaporation of the solvent, possible cracks will take on a stronger appearance in the form of red lines against the white background.
NOTE!
If the cracks are filled with grease, oil etc. this crack detection method cannot be ap-plied. In such cases a magnetic particle examination is required.
Where the cracks are extremely deep, the dye-penetrant liquid may penetrate so far into the crack that it cannot be seen on the “developer”. Therefore, it must always be ensured that sufficient dye-penetrant liquid is applied and that it is given reasonable time to penetrate.
At temperatures below 0°C the plate requires pre-heating with a gas burner or a hot-air blaster before the dye-penetrant liquid is applied. For any further information see ISO 3879-1977.
Magnetic Particle Examination
Magnetic particle and magnetic powder examinations are performed by covering the area to be examined for surface cracks with a ferromagnetic indication material (mag-netic powder). A magnetic field is then generated in the area in at least two directions with the highest attainable degree of perpendicularity relative to one another.
To facilitate the identification of cracks, a light contrasting colour should be applied to the area to be examined by painting before the examination is conducted. The equip-ment needed (in addition to the consumables) is a hand-held yoke for magnetic detec-tion, see Figure 3.8.
Safety Aspects
When the inspection around the kiln takes place it is most essential that the personnel performing the inspection shows extreme carefulness to avoid coming into contact with any of the moving or hot parts of the kiln.
Only personnel with the appropriate authority shall be allowed to perform the inspection and be allowed to remove any guard and protection to enable the inspection to be car-ried out. And they must be held responsible for replacing any guard or protection which has been removed.
The personnel must wear personal safety equipment such as helmet, shoes and clothes that fits. Any kind of loose hanging clothes or scarves shall be avoided as these can be caught by the moving machinery and be the cause for fatal damage.
Not only the personnel but also the machinery shall be protected against any damage during the inspection.
When an inspection cover is removed it must be done in such a way that no dust or dirt will find its way into the machine. For instance, it will be extremely harmful if clinker dust entered into the supporting roller bearings each time the cover was removed.
Hi
To be honest your article is informative and very helpful. After i saw your site and i read it and it help me a lot.
Thanks for share your kind information.