Contents
Review and User Guide for the TomTom Tools Kiln Shell Laser
TO Download this post and all the books and excel sheets and my personal notes and presentations I collected about cement industry in the last 30 years click the below paypal link

The TomTom Tools Kiln Shell Laser is a state-of-the-art device designed for precision measurement of kiln shells. This comprehensive review covers its features, benefits, detailed specifications, and a step-by-step user manual to ensure you get the most out of this advanced tool.
Table of Contents
- Introduction
- Key Features
- Benefits
- Detailed Specifications
- Step-by-Step User Manual
- Examples of Use
- Maintenance Tips
- Frequently Asked Questions
- Conclusion
1. Introduction
The TomTom Tools Kiln Shell Laser is designed for professionals in the industrial kiln sector who require precise measurements of kiln shell deformation. This tool helps in maintaining the structural integrity and operational efficiency of kilns by providing real-time data on shell conditions.
2. Key Features
- High Precision: The Kiln Shell Laser offers accurate measurements of kiln shell deformation.
- Real-Time Data: Provides immediate feedback on the condition of the kiln shell.
- Durable Construction: Built to withstand the harsh environments typically found in industrial settings.
- User-Friendly Interface: Easy to operate, even for those with minimal technical expertise.
- Portable: Lightweight and easy to transport.
3. Benefits
- Accurate Measurements: Ensures precise data collection, which is critical for effective maintenance planning.
- Enhanced Kiln Performance: Regular monitoring helps maintain optimal kiln performance and extend its lifespan.
- Cost Savings: Prevents major repairs and downtimes through early detection of issues.
- Versatility: Suitable for various industrial applications beyond kilns.
4. Detailed Specifications
- Measurement Range: Up to 50 meters
- Material: High-grade aluminum and stainless steel
- Accuracy: ±0.01%
- Display: Digital LCD
- Power Source: Rechargeable battery
- Weight: 3.5 kg
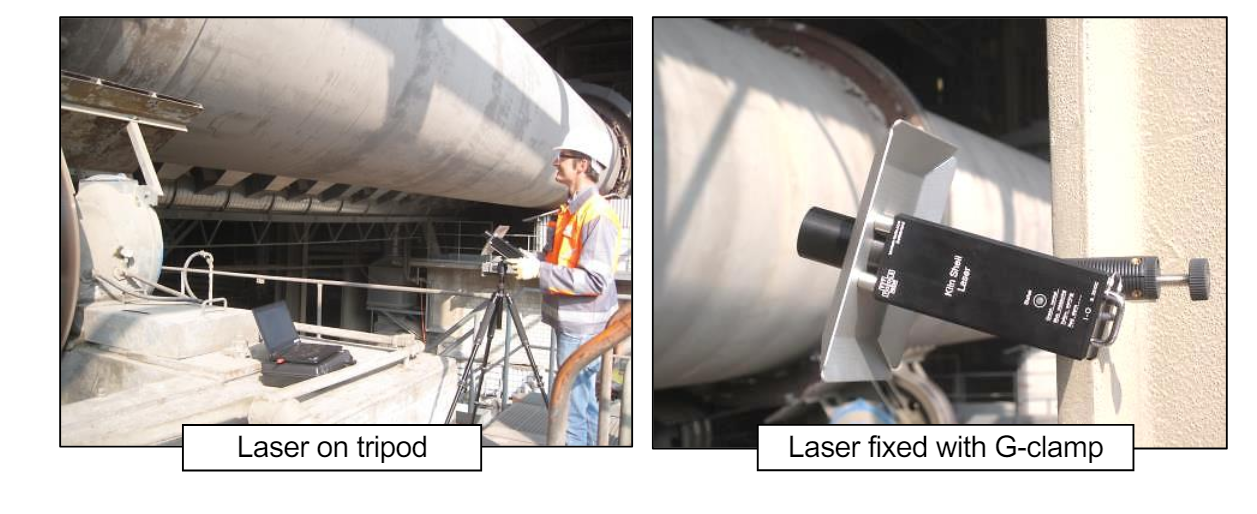
5. Step-by-Step User Manual
Step 1: Setup
- Unpack the Kiln Shell Laser: Carefully remove the laser device from its packaging and check for any visible damage.
- Charge the Battery: Ensure the battery is fully charged before use. Connect the charger to the device and plug it into a power source.
Step 2: Calibration
- Power On: Turn on the Kiln Shell Laser by pressing the power button.
- Initialize Calibration: Follow the on-screen prompts to initiate the calibration process.
- Zero Calibration: Ensure the device reads zero before starting a measurement. Use the calibration tool if necessary.
Step 3: Measurement
- Position the Laser: Place the laser at the starting point of the kiln shell you want to measure.
- Align the Laser: Ensure the laser beam is perpendicular to the kiln shell for accurate measurements.
- Take the Measurement: Activate the measurement process by pressing the measure button. The device will scan the kiln shell and provide real-time data on the display.
- Record the Data: Note the measurement readings displayed on the LCD.
Step 4: Repeat for Accuracy
- Multiple Readings: To ensure accuracy, take multiple measurements at different points around the kiln shell and calculate the average.
- Cross-Check: Use different measurement modes if available to cross-check data.
6. Examples of Use
Example 1: Routine Kiln Maintenance
During a routine inspection, the maintenance team uses the Kiln Shell Laser to measure the kiln shell’s deformation. Accurate measurements help identify any deformations early, allowing for timely repairs.
Example 2: Post-Repair Validation
After performing repairs on a kiln, the team uses the Kiln Shell Laser to verify that the kiln shell is properly aligned and free from deformities. This ensures that the repairs were successful and that the kiln is ready for optimal operation.
7. Maintenance Tips
- Regular Cleaning: After each use, clean the laser lens and body to remove dust and debris.
- Battery Care: Recharge the battery regularly and avoid letting it drain completely.
- Periodic Calibration: Regularly check and calibrate the device to maintain its accuracy.
- Storage: Store the Kiln Shell Laser in its protective case to prevent damage.
8. Frequently Asked Questions
Q1: How often should the Kiln Shell Laser be calibrated? A: It’s recommended to calibrate the device before each major measurement session and at regular intervals during use.
Q2: Can the Kiln Shell Laser be used on hot kiln shells? A: While it is designed to withstand high temperatures, for best results, it is recommended to use the device on cooled kiln shells.
Q3: What should I do if the laser is not aligning properly? A: Ensure the laser is positioned correctly and that there are no obstructions. If the issue persists, consult the troubleshooting section in the user manual or contact the manufacturer for support.
9. Conclusion
The TomTom Tools Kiln Shell Laser is an invaluable asset for professionals in the industrial kiln sector. Its precision, durability, and real-time data capabilities make it a top choice for monitoring kiln shell conditions. By following the detailed user manual and maintenance tips provided in this guide, users can maximize the benefits and lifespan of this advanced tool.
For more information or to purchase the TomTom Tools Kiln Shell Laser, visit the product page.
TO Download this post and all the books and excel sheets and my personal notes and presentations I collected about cement industry in the last 30 years click the below paypal link